Thursday, September 29, 2016

Pumpkin Spice Latte Mini "Coffee Cakes"


Fall is upon us my friends. Brisk mornings. Breezy dances between the wind and leaves, whirling and spiraling to be caught up on the invisible current over and over until the gentle weight of snow finally holds them still. The first snow has also arrived on the hills behind us as a reminder to enjoy every moment of the warm afternoons and long golden rays of sunshine while they're here.


pumpkin-spice-latte-cupcakes
Along with Pumpkin Spice Lattes. I may not look forward to them as much as some diehard Starbuck's fans but I'm in love with these tiny baked miniature versions!

pumpkin-spice-latte-cupcakes
I made about 90 of them recently and served them up in mini paper cups (about 3" tall) with little spoons so that nary a crumb could escape.


pumpkin-spice-latte-mini-coffee-cakes
The plain white mini cups were about 3" tall with a logo that was printed out to regular white paper and punched with a circle cutter. A glue stick made quick work of slapping them on to imitate their famous cousins.

The insides . . .  oh those lovely insides!!! Two layers of pumpkin spice latte cake nestled in with butterscotch syrup and swiss meringue buttercream. Ateco tip 829 was just the thing to imitate that generous whipped cream look. A little shower of cinnamon to finish them off and they were out the door!

Want to make your own? Here's the cake recipe. I switched out the buttercream for this one and I'm loving it although it firms up to butter consistency when refrigerated. Not a problem. 10 seconds in the microwave brings these tiny cups of deliciousness back to their original glory.

Enjoy!!!


Thursday, September 22, 2016

Mini Witches Cauldron Cupcake or Cake Toppers Tutorial


halloween-cupcake-cake-toppers-witches-cauldron-candy-corn-flames


SHEILD YOUR EYES!!! The cake pictures were taken late at night and all of the editing in the world (or underworld) can't save them. There. Disclaimer done.


candy-corn-flames-witches-cauldron-halloween-cupcake-topper-tutorial
I made 45 mini cakes for a school cake walk a few Halloweens ago. In nine styles. Some were more involved than others. Don't even get me started on the lame plastic or candy hands used for cake styles 6 & 9. I was tired of hand molding scary hands and making bubble gum spiders by then.


bones-skeleton-free-halloween-cake-cupcake-topper-tutorial

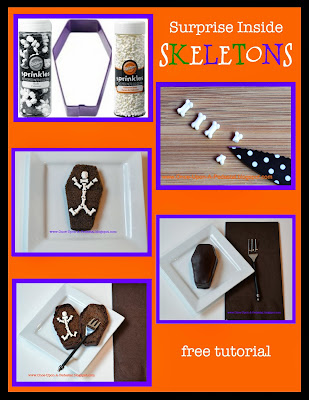
Not to mention making tiny skeletons in little surprise inside coffins. I propped up the lids so you could peek inside for these mini cake toppers but you can see how to make the originals from brownies or moist chocolate cake here.

skeleton-bones-candy-corn-flames-cauldron-halloween-cake-free-tutorial
These mini cauldrons were by far the most popular and the first to be chosen by the cake walk winners. 


witches-candy-corn-cauldron-free-halloween-cake-tutorial
Easy. You can use cake pops if you'd like but these Lindor Truffles make the job SOOOO much quicker.
Costco carries some larger bags during the holidays.

halloween-cake-witch-cauldron-candy-corn-flames-free-tutorial
They come in an assortment of flavors. Even white chocolate. All delicious. I may have sampled 1 or 12.


halloween-cake-candy-corn-witch-cauldron-free-tutorial
Poke a toothpick in the bottom of the candy where it has a natural mark from when it was born.
Okay. It's a belly button.  You can explain this to your kids. That's WAAAY beyond my pay grade.

Heat a metal tray in the oven an place the truffle on a small piece of parchment on the tray just long enough to get a flat surface.


halloween-cake-witch-cauldron-candy-corn-flames-free-tutorial
Paint the cooled truffles with a mixture of black food powder and vodka or thinned black gel color.


halloween-cauldron-witch-candy-corn-flames-cake-free-tutorial
Top the cauldrons with light green Candy Melts. Add dragees and some candy pearls for the bubbles with some candy bones thrown in for a real witches brew. 

Make a ring of candy corn flames and set your adorable little cauldrons on top.

Finished. Told you it was easy.

Want to make some?


Mini Cauldron Toppers

Supplies:
Toothpicks (1 per cauldron)
Lindor Truffles (1 per cauldron)
Lorrann’s black powder
Vodka or extract
Paintbrush
Ziploc bags (2)
Cookie sheets (2)
Scissors
Wilton’s Candy Bones (3-5 per cupcake)
Candy Corn (six per cupcake)
Green Candy Melts
Paramount Crystals or paraffin wax chips
Candy pearls, dragees (1 teaspoon or less per cupcake)
Americolor Electric Green

Other Equipment:
Oven burner
Microwave

Procedure:

1)   Color 2-3 different sized dragees and candy pearls with Americolor Electric Green using a Ziploc bag. Spread in thin layer on parchment or wax paper covered cookie sheet to dry. 
2)   Place toothpick in bottom of one Lindor Truffle. Melt top to flatten using cookie sheet over burner on very lowest setting. Set aside to cool leaving toothpick in place. 
3)   Paint exterior of cauldron with a mixture of Lorann’s black powder food color and vodka or extract of choice. Set aside to dry.
4)   Melt lime green candy melts in Ziploc bag along with Paramount Crystals or parafin. Add Electric Green Americolor until desired shade is reached. 1 minute at 50% power, check, repeat. Clip a tiny corner from the melted bag of candy melts. Pipe on top of cauldron allowing some areas of drips to imitate pot bubbling over. Add previously colored dragees/candy pearls as bubbles.
5)   Pipe tiny dots on top of the bubbles and attach 3-5 bones per cauldron. 
6)   Frost the mini cake or cupcake with dark chocolate or black tinted frosting. Add 6 pieces of candy corn to form the fire. Pipe a small dot of frosting in the center of the fire and place the cauldron on top.


SaveSave

Sunday, September 4, 2016

Day of the Dead Cookies

day-of-the-dead-skull-easy-halloween-cookies-fred-sweet-spirits-Día-de-Muertos


Lots of experimenting for Halloween going on around here lately!


day-of-the-dead-skull-easy-halloween-cookies-fred-sweet-spirits-Día-de-Muertos
This was the first cookie that was sort of going in the direction I hoped for.

day-of-the-dead-skull-easy-halloween-cookies-fred-sweet-spirits-Día-de-Muertos

day-of-the-dead-skull-easy-halloween-cookies-fred-sweet-spirits-Día-de-Muertos
Earlier tries were plain black until I added some nonpareils. But they just looked messy.
Like a small child had been playing in my kitchen. Which, to be honest, is mostly true.
Small kid, big body. And lots of wrinkles. How did THAT happen?
And WHO got sprinkles ALL over the kitchen floor???


day-of-the-dead-skull-easy-halloween-cookies-fred-sweet-spirits-Día-de-Muertos
I added white face paint for a more authentic feel. And then I thought, "sprinkles always say fun.
Who doesn't want to have fun?" When you're dead.


day-of-the-dead-skull-easy-halloween-cookies-fred-sweet-spirits-Día-de-Muertos
But the designer of this cookie cutter and stamp set made smiles on the skulls so . . . 
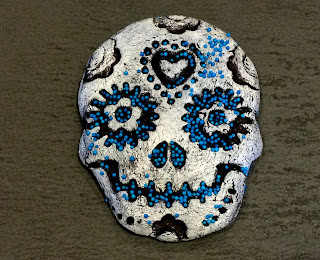
sPrInkLeS!!! Definitely.

I only used two of the four possible stamps in the set. They're all fun. And smiley. You may want to try all of them just to be fair. And so that no one feels left out.

I just couldn't see myself putting all those separate colors in those tiny spaces. And just pouring on blue (my favorite) wasn't the answer. Neither was piping on royal icing. Way too predictable. Okay. Alright. I'm lazy. And not a great piper. And a host of other excuses if you give me time.


day-of-the-dead-skull-easy-halloween-cookies-fred-sweet-spirits-Día-de-Muertos
The next attempt was to add some sprinkles around the edge during baking.
But not all of them wanted to stay put.

day-of-the-dead-skull-easy-halloween-cookies-fred-sweet-spirits-Día-de-Muertos
So I added them after baking with a thin coating of white chocolate to glue them down.
And I was pretty happy. Until I got them done. Then I wasn't sure. Again.

day-of-the-dead-skull-easy-halloween-cookies-fred-sweet-spirits-Día-de-Muertos
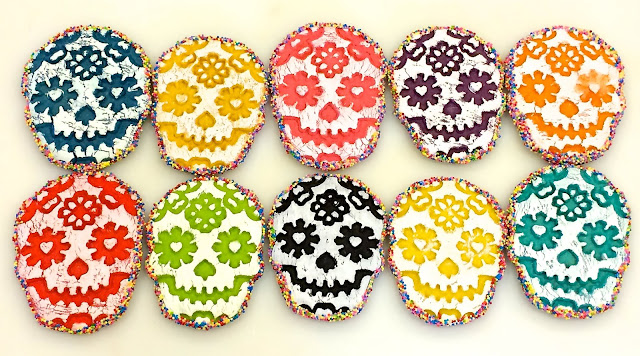
 Plain? In five Halloween colors?


day-of-the-dead-skull-easy-halloween-cookies-fred-sweet-spirits-Día-de-Muertos
Or with sprinkles in ten fun colors?


day-of-the-dead-skull-easy-halloween-cookies-fred-sweet-spirits-Día-de-Muertos
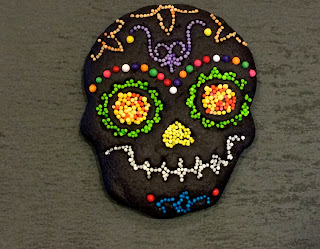
Or ten fun colors with no sprinkles? Do you feel my dilemma?


day-of-the-dead-skull-easy-halloween-cookies-fred-sweet-spirits-Día-de-Muertos
These cute little suckers at World Market didn't help me decide in the end.
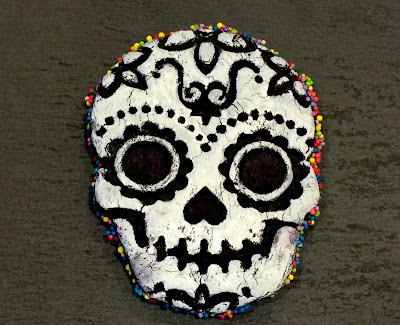
But they were the inspiration to paint their sweet little cheeks and the rest of their faces white.


wilton-white-food-colorday-of-the-dead-skull-easy-halloween-cookies-fred-sweet-spirits-Día-de-Muertos
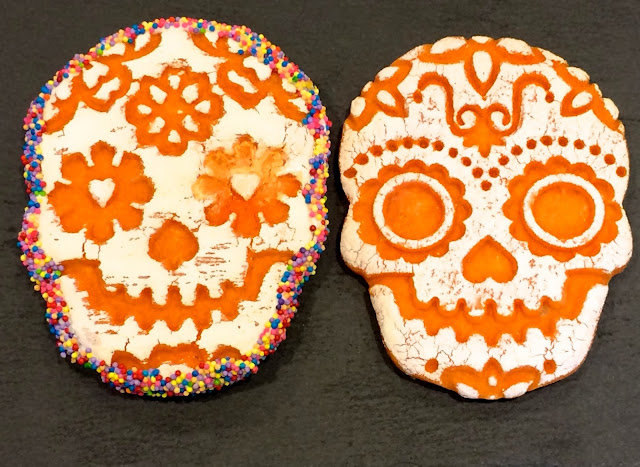
I used Wilton White liquid coloring straight from the bottle. Just brushed it on with a flat brush and tried not to get any in the embossed areas. Which mostly happened.


day-of-the-dead-skull-easy-halloween-cookies-fred-sweet-spirits-Día-de-Muertos
Except for on the orange one with sprinkles. She ended up with a white eye in the struggle. Which might've been a black eye if she was still alive but instead could be just a smashed eye socket. Lesson here is to go easy on the white. It doesn't come off no matter how you try.

The paint cracked a little during baking which turned out to be a happy accident. It seems a bit more like actual face paint than a smooth coat would've achieved. Remember how face paint kind of cracks off after you've worn it for a while? Especially when you smile a lot.


day-of-the-dead-skull-easy-halloween-cookies-fred-sweet-spirits-Día-de-Muertos
Which do you prefer? I still can't decide. Good thing I've got some time to make up my mind.

Meanwhile, heads will roll around here. If they don't get bitten off first. The recipe is one of Georganne Bell's aka Lila Loa and it's delicious! She has a whole bunch for you to choose from and they're all great!.

I divided up the mixture and colored it with Americolor gels before it was completely a dough and the cookies stayed soft rather than tough as I'd feared. Have no fear yourself and let me know which, if any of these, work in your eyes. I need your help here guys.

xoxo,
Deborah
SaveSaveSaveSave